How to build and deploy a Facebook Messenger bot with Python and Flask, a tutorial
Posted on Thu 02 June 2016 in tutorial
This is my log of how I built a simple Facebook Messenger bot. The functionality is really simple, it's an echo bot that will just print back to the user what they write.
This is something akin to the Hello World example for servers, the echo server.
The goal of the project is not to build the best Messenger bot, but rather to get a feel for what it takes to build a minimal bot and how everything comes together.
Tech Stack
The tech stack that was used is:
- Heroku for back end hosting. The free-tier is more than enough for a tutorial of this level. The echo bot does not require any sort of data persistence so a database was not used.
- Python was the language of choice. The version that was used is 2.7 however it can easily be ported to Python 3 with minor alterations.
- Flask as the web development framework. It's a very lightweight framework that's perfect for small scale projects/microservices.
- Finally the Git version control system was used for code maintenance and to deploy to Heroku.
- Worth mentioning: Virtualenv. This python tool is used to create "environments" clean of python libraries so you can only install the necessary requirements and minimize the app footprint.
Bot Architecture
Messenger bots are constituted by a server that responds to two types of requests:
- GET requests are being used for authentication. They are sent by Messenger with an authentication code that you register on FB.
- POST requests are being used for the actual communication. The typical workflow is that the bot will initiate the communication by sending the POST request with the data of the message sent by the user, we will handle it, send a POST request of our own back. If that one is completed successfully (a 200 OK status is returned) we also respond with a 200 OK code to the initial Messenger request.
For this tutorial the app will be hosted on Heroku, which provides a nice and easy interface to deploy apps. As mentioned the free tier will suffice for this tutorial.
After the app has been deployed and is running, we'll create a Facebook app and link it to our app so that messenger knows where to send the requests that are meant for our bot.
The Bot Server
The basic server code was taken from the following Chatbot project by Github user hult (Magnus Hult), with a few modifications to the code to only echo messages and a couple bugfixes I came across. This is the final version of the server code:
from flask import Flask, request
import json
import requests

app = Flask(__name__)

# This needs to be filled with the Page Access Token that will be provided
# by the Facebook App that will be created.
PAT = ''

@app.route('/', methods=['GET'])
def handle_verification():
  print "Handling Verification."
  if request.args.get('hub.verify_token', '') == 'my_voice_is_my_password_verify_me':
    print "Verification successful!"
    return request.args.get('hub.challenge', '')
  else:
    print "Verification failed!"
    return 'Error, wrong validation token'

@app.route('/', methods=['POST'])
def handle_messages():
  print "Handling Messages"
  payload = request.get_data()
  print payload
  for sender, message in messaging_events(payload):
    print "Incoming from %s: %s" % (sender, message)
    send_message(PAT, sender, message)
  return "ok"

def messaging_events(payload):
  """Generate tuples of (sender_id, message_text) from the
  provided payload.
  """
  data = json.loads(payload)
  messaging_events = data["entry"][0]["messaging"]
  for event in messaging_events:
    if "message" in event and "text" in event["message"]:
      yield event["sender"]["id"], event["message"]["text"].encode('unicode_escape')
    else:
      yield event["sender"]["id"], "I can't echo this"


def send_message(token, recipient, text):
  """Send the message text to recipient with id recipient.
  """

  r = requests.post("https://graph.facebook.com/v2.6/me/messages",
    params={"access_token": token},
    data=json.dumps({
      "recipient": {"id": recipient},
      "message": {"text": text.decode('unicode_escape')}
    }),
    headers={'Content-type': 'application/json'})
  if r.status_code != requests.codes.ok:
    print r.text

if __name__ == '__main__':
  app.run()
Let's break down the code. The first part is the imports that will be needed:
from flask import Flask, request
import json
import requests
Next we define the two functions (using the Flask specific app.route decorators) that will handle the GET and POST requests to our bot.
@app.route('/', methods=['GET'])
def handle_verification():
  print "Handling Verification."
  if request.args.get('hub.verify_token', '') == 'my_voice_is_my_password_verify_me':
    print "Verification successful!"
    return request.args.get('hub.challenge', '')
  else:
    print "Verification failed!"
    return 'Error, wrong validation token'
The verify_token object that is being sent by Messenger will be declared by us when we create the Facebook app. We have to validate the one we are being have against itself. Finally we return the "hub.challenge" back to Messenger.
The function that handles the POST requests is a bit more interesting.
@app.route('/', methods=['POST'])
def handle_messages():
  print "Handling Messages"
  payload = request.get_data()
  print payload
  for sender, message in messaging_events(payload):
    print "Incoming from %s: %s" % (sender, message)
    send_message(PAT, sender, message)
  return "ok"
When called we grab the massage payload, use function messaging_events to break it down and extract the sender user id and the actual message sent, generating a python iterator that we can loop over. Notice that in each request sent by Messenger it is possible to have more than one messages.
def messaging_events(payload):
  """Generate tuples of (sender_id, message_text) from the
  provided payload.
  """
  data = json.loads(payload)
  messaging_events = data["entry"][0]["messaging"]
  for event in messaging_events:
    if "message" in event and "text" in event["message"]:
      yield event["sender"]["id"], event["message"]["text"].encode('unicode_escape')
    else:
      yield event["sender"]["id"], "I can't echo this"
While iterating over each message we call the send_message function and we perform the POST request back to Messnger using the Facebook Graph messages API. During this time we still have not responded to the original Messenger request which we are blocking. This can lead to timeouts and 5XX errors.
The above was spotted during an outage due to a bug I came across, which was occurred when the user was sending emojis which are actual unicode ids, however Python was miss-encoding. We ended up sending back garbage.
This POST request back to Messenger would never finish, and that in turn would cause 5XX status codes to be returned to the original request, rendering the service unusable.
This was fixed by escaping the messages with encode('unicode_escape') and then just before we sent back the message decode it with decode('unicode_escape').
def send_message(token, recipient, text):
  """Send the message text to recipient with id recipient.
  """

  r = requests.post("https://graph.facebook.com/v2.6/me/messages",
    params={"access_token": token},
    data=json.dumps({
      "recipient": {"id": recipient},
      "message": {"text": text.decode('unicode_escape')}
    }),
    headers={'Content-type': 'application/json'})
  if r.status_code != requests.codes.ok:
    print r.text
Deploying to Heroku
Once the code was built to my liking it was time for the next step. Deploy the app.
Sure, but how?
I have deployed apps before to Heroku (mainly Rails) however I was always following a tutorial of some sort, so the configuration has already been created. In this case though I had to start from scratch.
Fortunately it was the official Heroku documentation to the rescue. The article explains nicely the bare minimum required for running an app.
Long story short, what we need besides our code are two files. The first file is the "requirements.txt" file which is a list of of the library dependencies required to run the application. The second file required is the "Procfile". This file is there to inform the Heroku how to run our service. Again the bare minimum needed for this file is the following:
web: gunicorn echoserver:app
The way this will be interpreted by heroku is that our app is started by running the echoserver.py file and the app will be using gunicorn as the web server. The reason we are using an additional webserver is performance related and is explained in the above Heroku documentation:
Web applications that process incoming HTTP requests concurrently make much more efficient use of dyno resources than web applications that only process one request at a time. Because of this, we recommend using web servers that support concurrent request processing whenever developing and running production services. The Django and Flask web frameworks feature convenient built-in web servers, but these blocking servers only process a single request at a time. If you deploy with one of these servers on Heroku, your dyno resources will be underutilized and your application will feel unresponsive. Gunicorn is a pure-Python HTTP server for WSGI applications. It allows you to run any Python application concurrently by running multiple Python processes within a single dyno. It provides a perfect balance of performance, flexibility, and configuration simplicity.
Going back to our "requirements.txt" file let's see how it binds with the Virtualenv tool that was mentioned.
At anytime, your developement machine may have a number of python libraries installed. When deploying applications you don't want to have these libraries loaded as it makes it hard to make out which ones you actually use.
What Virtualenv does is create a new blank virtual enviroment so that you can only install the libraries that your app requires.
You can check which libraries are currently installed by running the following command:
kostis@KostisMBP ~ $ pip freeze
cycler==0.10.0
Flask==0.10.1
gunicorn==19.6.0
itsdangerous==0.24
Jinja2==2.8
MarkupSafe==0.23
matplotlib==1.5.1
numpy==1.10.4
pyparsing==2.1.0
python-dateutil==2.5.0
pytz==2015.7
requests==2.10.0
scipy==0.17.0
six==1.10.0
virtualenv==15.0.1
Werkzeug==0.11.10
Note: The pip tool should already be installed on your machine along with Python. If not check the official site for how to install it.
Now let's use Virtualenv to create a new blank enviroment. First we create a new folder for our project, and change dir into it:
kostis@KostisMBP projects $ mkdir echoserver
kostis@KostisMBP projects $ cd echoserver/
kostis@KostisMBP echoserver $
Now let's create a new enviroment called echobot. To activate it you run the following source command, and checking with pip freeze we can see that it's now empty.
kostis@KostisMBP echoserver $ virtualenv echobot
kostis@KostisMBP echoserver $ source echobot/bin/activate
(echobot) kostis@KostisMBP echoserver $ pip freeze
(echobot) kostis@KostisMBP echoserver $
We can start installing the libraries required. The ones we'll need are flask, gunicorn, and requests and with them installed we create the requirements.txt file:
(echobot) kostis@KostisMBP echoserver $ pip install flask
(echobot) kostis@KostisMBP echoserver $ pip install gunicorn
(echobot) kostis@KostisMBP echoserver $ pip install requests
(echobot) kostis@KostisMBP echoserver $ pip freeze
click==6.6
Flask==0.11
gunicorn==19.6.0
itsdangerous==0.24
Jinja2==2.8
MarkupSafe==0.23
requests==2.10.0
Werkzeug==0.11.10
(echobot) kostis@KostisMBP echoserver $ pip freeze > requirements.txt
After all the above have been run, we create the echoserver.py file with the python code and the Procfile with the command that was mentioned, and we should end up with the following files/folders:
(echobot) kostis@KostisMBP echoserver $ ls
Procfile     echobot     echoserver.py   requirements.txt
We are now ready to upload to Heroku. We need to do two things. The first is to install the Heroku toolbet if it's not already installed on your system (go to Heroku for details). The second is to create a new Heroku app through the web interface.
Click on the big plus sign on the top right and select "Create new app".

Pick a name for your app and click "Create App".
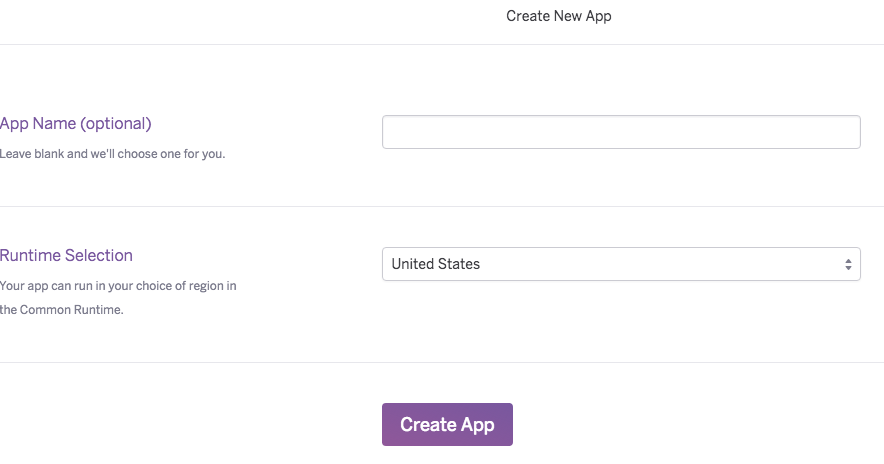
You should now be redirected on your app dashboard and you can find the details of how to deploy the app to heroku.
(echobot) kostis@KostisMBP echoserver $ heroku login
(echobot) kostis@KostisMBP echoserver $ git init
(echobot) kostis@KostisMBP echoserver $ heroku git:remote -a <myappname>
(echobot) kostis@KostisMBP echoserver $ git add .
(echobot) kostis@KostisMBP echoserver $ git commit -m "Initial commit"
(echobot) kostis@KostisMBP echoserver (master) $ git push heroku master
...
remote:        https://<myappname>.herokuapp.com/ deployed to Heroku
...
(echobot) kostis@KostisMBP echoserver (master) $ heroku config:set WEB_CONCURRENCY=3
As per above, after you push your changes to Heroku you should be provided with the URL to publically access your newly created app. Save that URL because it will be needed in the next step.
Creating the Facebook App
The last step to getting the bot working is to create the Facebook app that will connect to our service. Facebook typically requires every app to also have a relevant page so start by creating one. Next go to the Facebook developers page click on the "My Apps" button on the top right and select "Add a New App". Don't pick one of the suggestions but instead click "basic setup". Fill out the required field and click "Create App Id". You should now be redirected to the new app page.
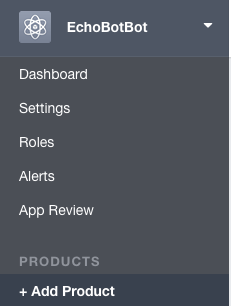 Under "Products", click "+ Add Product" then under "Messenger" click "Get Started". Follow the steps to set up Messenger and once it's finished you're ready to setup your webhooks. Webhooks are simply a name for the url that your service is using. Click on the "Setup Webhooks" button and add the Heroku app URL (the one you saved earlier). Under verify token add 'my_voice_is_my_password_verify_me'. You can add anything you want but whatever you add here should also be changed in the if check in the handle_verification function of the code. Also tick the "messages" option.
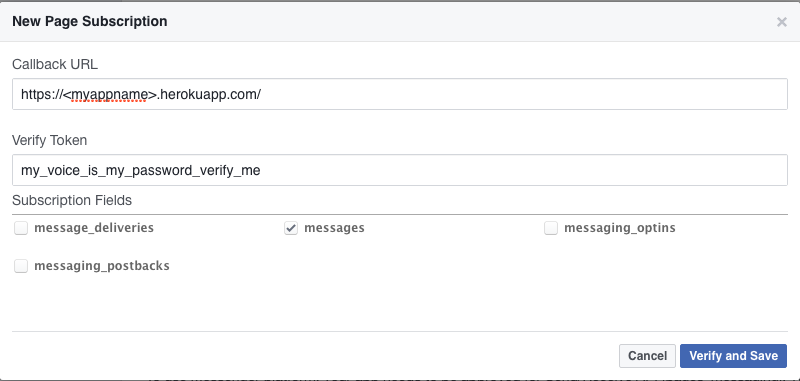 Click "Verify and Save" and you should be done. Facebook should access the Heroku app and verify it. If it's not working try running:
(echobot) kostis@KostisMBP heroku logs -t
and check the logs for any errors. If any are found, google for the answer as this is usually the fastest way to resolve them.
The last step is to get a Page Access Token by linking the Facebook app with the page you have created.
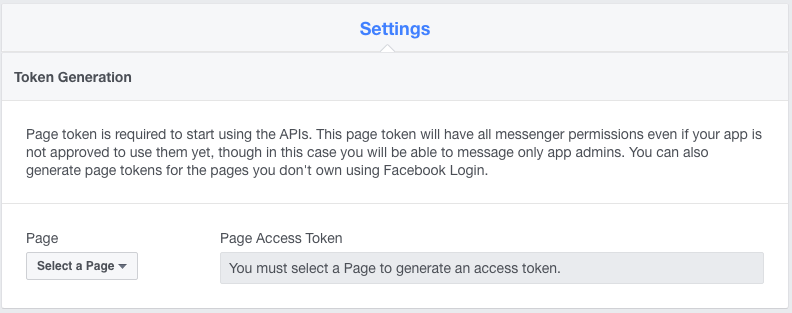
From the drop down select the page you have created. This should generate an alphanumerical string under "Page Access Token". Click it to copy and edit the echoserver.py file, pasting the string to the PAT variable. Then add, commit and push the changes.
(echobot) kostis@KostisMBP echoserver (master) $ git add .
(echobot) kostis@KostisMBP echoserver (master) $ git commit -m "Initial commit"
(echobot) kostis@KostisMBP echoserver (master) $ git push heroku master
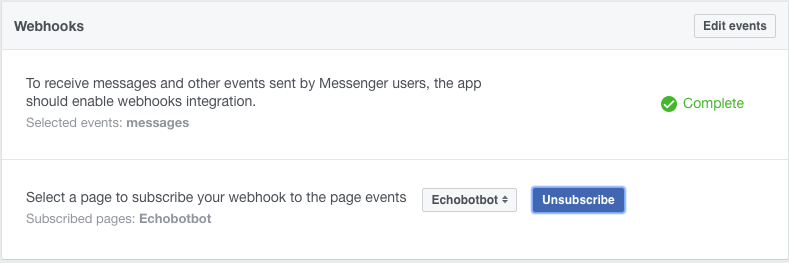
Finally under Webhooks pick you page again and click "Subscribe".
Now go to your page and initiate a conversation:
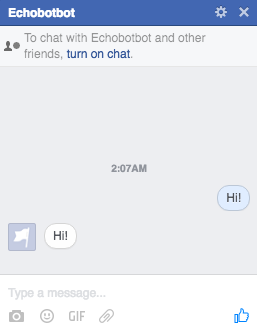
Success! The bot echoes back!
Note: Until you request your app to be reviewed for Messenger you will be the only one the bot will be responding to. If you want other to try it, go to the Facebook developers page, select your app, the Roles and add the users you want as Testers.
Conclusion
This has been a very informative project for me, hope it points you to the right direction to get started. The official Facebook guide has a ton of resource to move forward.
You can find the code for this project on github.
If you have any remarks, bugs, suggestions etc feel free to contact me.