How I built a smart(ish) home with HomeAssistant, a Conbee USB and MotionEye
Posted on Sun 08 March 2020 in tutorial
Installation guidelines for everything I have setup in my smart home setup. This is a log for recreation for me and anyone else that might find it useful.
My home setup consists of Xiaomi motion sensors that are controlling some Phillips Hue lightbulbs, and a USB camera for monitoring my house and my cat :) when I'm away. I'm also using a conbee USB stick so that I don't have to buy the Phillips and the Xiaomi specific bridges, and also the open source home assistant app to control the lights manually.
Required Components
- A RaspberryPi 3/3+/4
- A Conbee USB stick
- A USB Camera
Installing Raspbian
So the first thing we need to do is install the latest Raspbian image on an SD card.
You can choose any of the available images but because I'll be accessing the Pi via the terminal with SSH I chose Raspbian Buster Lite which is a smaller image.
For writing the image to the SD card I used the Balena Etcher tool.
After downloading and writing the image we need to add the following two files in the root folder of the SD card:
- a file called
wpa_supplicant.conf - and a file
ssh
For wpa_supplicant.conf
The first file is used to automatically connect to a WIFI network. There are extensive instructions on what will go on this file in the official raspberry documentation. In short what needs to go in there is:
ctrl_interface=DIR=/var/run/wpa_supplicant GROUP=netdev
update_config=1
country=<Insert country code here>
network={
    ssid="testing"
    psk="testingPassword"
}
The first 3 lines are configuration related and we only need to replace the country code, with the relevant code from Wikipedia. In my case it's GR for Greece.
The second part, inside the network curly braces is for the wireless network name and password. Replace the ssid with the network name and the psk with password and save the file.
For ssh
The second file we need to create is an empty file named ssh (no file extension). This need to go again to the root path of the SD Card. We need this to enable ssh access on the Pi as per the blogpost on the raspberry site.
Accessing the Pi
Connect the RaspberryPi to a powersupply, wait a few seconds, and it should be ready to connect. Now the tricky part is, because the Pi is assigned an IP by the router we need to figure out which IP that is.
We can either use the router web interface to get the assigned IP or use a tool like Fing or similar, which when installed on a device on a network, will scan and display the information for all devices in the same network.
After we find this IP the we can simply ssh to it via a terminal (the default password is raspberry):
$ ssh pi@192.168.2.13
Now we are ready to start setting things up. First we need to do some securing. Let's start by changing the default password for the user pi:
$ passwd
Changing password for pi.
Current password:
New password:
Retype new password:
passwd: password updated successfully
Type the old password, and the new one. Then let's update the system and install vim the text editor:
$ sudo apt-get update
$ sudo apt-get upgrade -y
$ sudo apt-get install vim -y
Now let copy our ssh key from a local machine to the Pi. I use the ssh-copy-id command to do so but you can find out how to copy an ssh key by googling for your system.
$ ssh-copy-id pi@192.168.2.13
So now that we have our key to the Pi, as an extra measure of security let's deactivate ssh as the root user and the option to login with a password:
sudo vim /etc/ssh/sshd_config
by adding the following to the sshd_config file:
PermitRootLogin no
PasswordAuthentication no
Installing HomeAssistant
Now let's move on the installing the HomeAssistant. By default HomeAssistant provides a docker image called hass.io but we'll use the alternative manual installation method provided by homeassistant
Start by installing the required dependencies:
$ sudo apt-get install python3 python3-dev python3-venv python3-pip libffi-dev libssl-dev
Then we create a new user and following the rest of the steps:
$ sudo useradd -rm homeassistant -G dialout,gpio,i2c
$ cd /srv
$ sudo mkdir homeassistant
$ sudo chown homeassistant:homeassistant homeassistant
$ sudo -u homeassistant -H -s
$ cd /srv/homeassistant
$ python3 -m venv .
$ source bin/activate
$ python3 -m pip install wheel
$ pip3 install homeassistant
Once everything has been setup we run HomeAssistant with the hass command.
$ hass
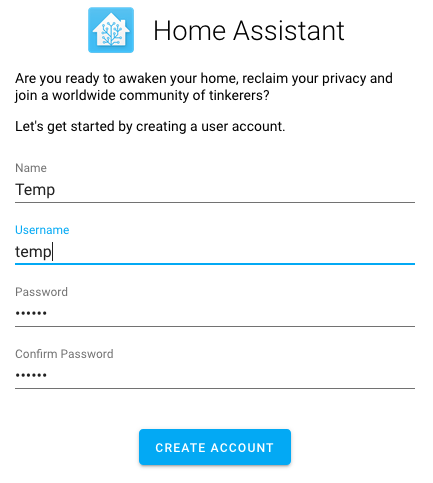
After about 5-10 minutes (initial setup) going to the following url (this is the raspberry pi IP for mine, you need to replace with yours) http://192.168.2.13:8123 should load the following screen:
Now we want HomeAssistant to start at every RaspberryPi reboot so we will follow the instructions here:
Let's create a new service file:
$ sudo vim /etc/systemd/system/[email protected]
and add the following in it:
[Unit]
Description=Home Assistant
After=network-online.target

[Service]
Type=simple
User=homeassistant
ExecStart=/srv/homeassistant/bin/hass -c "/home/homeassistant/.homeassistant"

[Install]
WantedBy=multi-user.target
then enable the service by running the following:
$ sudo systemctl enable home-assistant@homeassistant
Finally this should set everything up, and rebooting the Pi we should be able to access homeassistant in the web interface without having to manual starting it. For details on how to use homeassistant read the guide on their site.
Installing Conbee
The next piece of software we need to install is Conbee. It's the application that is using the USB stick that connects all the Zigbee compatible devices. We will follow the installation instructions from the official page.
Run the instruction to install deconz:
$ sudo gpasswd -a $USER dialout
$ wget -O - http://phoscon.de/apt/deconz.pub.key | \
           sudo apt-key add -
$ sudo sh -c "echo 'deb http://phoscon.de/apt/deconz \
            $(lsb_release -cs) main' > \
            /etc/apt/sources.list.d/deconz.list"
$ sudo apt update
$ sudo apt install deconz
Then start (and enable as to be starting at each reboot) the created deconz and deconz-gui services:
$ sudo systemctl enable deconz
$ sudo systemctl enable deconz-gui
$ sudo systemctl start deconz
$ sudo systemctl start deconz-gui
The go to the web app and it will autodetect the device to set it up. From here you can connect your devices.
http://phoscon.de/app
Install DuckDNS
We want to be able to access the home assistant interface even when we're outside the home. Because the home connection usually doesn't have a static IP to connect to we need some other way to be able to access the home network whenever we want. This is where DuckDNS comes in. They give you 5 free subdomains under <SUBDOMAIN>.duckdns.org. The only problem is having a way to update the mapping of the home connection IP to this domain name.
DuckDNS provides instructions on how to create a cron job (basically a script that will run periodically) and contact the DuckDNS service to let them know if the IP associated with this subdomain needs updating.
First go to their website and create a new account. After this has been setup choose you subdomain and click the add domain button.

Then go to the install link on the top of the page, then under Operating Systems choose linux cron and under first step - choose a domain. click on the domain you have created.
Follow the instructions they have there and you should be ready with your brand new domain always pointing to your home IP.
Installing PiVPN
The next step is installing the PiVPN program which is the actual software that lets you connect any machine (PC, or mobile) to your home network. There's a simple script that takes care of the installation and you can run it with the following:
$ curl -L https://install.pivpn.io | bash
Choose the default settings and install it. When asked for using a static IP or a domain name, select the enter the domain name we created in DuckDNS. The only thing that I have changed in the installation is the port on which it communicates.
Notice that you need to open this port to your router. This is accomplished by what is called port forwarding in most routers, but because it's specific to each router, I can't help with that. However this website has instructions for a multitute of routers.
Now we need to create a new profile for a new user. To do that run the pivpn add command on the raspberry and enter a name for the client:
pi@raspberrypi:~ $ pivpn add
Enter a Name for the Client: test
::: Client Keys generated
::: Client config generated
::: Updated server config
::: WireGuard restarted
======================================================================
::: Done! test.conf successfully created!
::: test.conf was copied to /home/pi/configs for easy transfer.
::: Please use this profile only on one device and create additional
::: profiles for other devices. You can also use pivpn -qr
::: to generate a QR Code you can scan with the mobile app.
======================================================================
And it's ready! To connect from your device follow the instruction to install the WireGuard client from their webpage.
If you install it on a mobile device use the pivpn -qr command to generate a QR code that you can scan from inside the mobile app to quickly setup the profile and connect.
Installing MotionEye
For this step you need to have attached the USB camera to the raspberry pi.
The final piece of software that we'll install on the Pi is MotionEye. It's a frontend software for the popular motion project that handles video signals from many types of cameras.
To install it we will use the instructions on the github page.
$ sudo apt-get install ffmpeg libmariadb3 libpq5 libmicrohttpd12
$ wget https://github.com/Motion-Project/motion/releases/download/release-4.2.2/pi_buster_motion_4.2.2-1_armhf.deb
$ sudo dpkg -i pi_buster_motion_4.2.2-1_armhf.deb
$ sudo apt-get install python-pip python-dev libssl-dev libcurl4-openssl-dev libjpeg-dev libz-dev
$ sudo pip install motioneye
$ sudo mkdir -p /etc/motioneye
$ sudo cp /usr/local/share/motioneye/extra/motioneye.conf.sample /etc/motioneye/motioneye.conf
$ sudo mkdir -p /var/lib/motioneye
$ sudo cp /usr/local/share/motioneye/extra/motioneye.systemd-unit-local /etc/systemd/system/motioneye.service
$ sudo systemctl daemon-reload
$ sudo systemctl enable motioneye
$ sudo systemctl start motioneye
Please make sure that you follow the instructions on the page not my copy here as they might change over time.
Now if everything has been setup correctly going to the local address ( http://192.168.2.13:8765/ ) should open up the MotionEye page.
The default credentials to login are admin for the username and an empty password.
Next there should be a page with the a link the add a camera. Click on it and select the following:
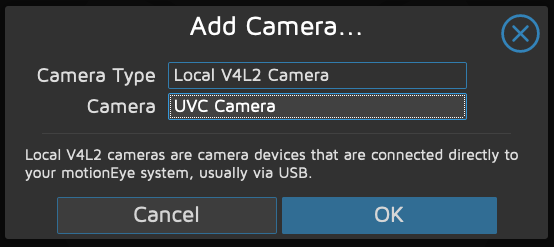
This should create a set of options on the left side of the page as well as a window with a live feed from the camera.
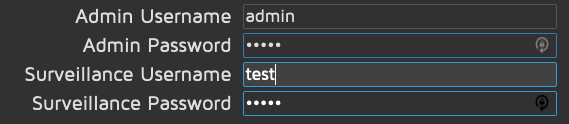
First go under General Settings and setup the Admin password and potionally a Surveillance username and password. The latter two are used for streaming the video only to a different post.
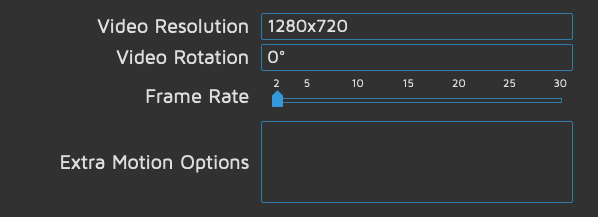
Then under video device change the resolution to 1280x720.
And finally if you want to setup streaming to a different port, select the video streaming option and set the authentication mode to basic.
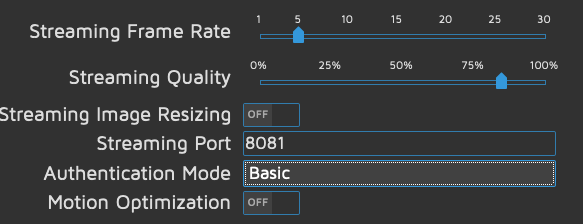
Then click apply and everything should be setup and ready to use.
Now if you go to you local raspberry pi IP and port 8081 (in my case http://192.168.2.13:8081), after you login with the Surveillance username and password credentials you should see the streaming video from your camera.
And if you have setup the WireGuard app on your mobile, and activated you profile you should be able to access this feed whenever you have internet access.
Final Thoughts and Future Work
I'm planning to make this automated setup a little smarter by adding some machine learning based control, so stay tuned for this.